Install the SAP ADS OLEDB driver.
1. Download the applicable version for your OS from here -
32-Bit Operating Systems:
http://www.capitaloffice.com.au/downloads/ADS/oledb.exe
64-Bit Operating Systems:
http://www.capitaloffice.com.au/downloa ... x86_64.exe
2. Install the software and when prompted for the ANSI Character Set, select 'ASCII' from the drop-down list, then press OK.
3. Press 'Finish' and your connector should be installed.
STEP 2
Connect Excel to your database.
1. Open Excel.
2. Select 'DATA' tab from the Excel home screen
3. Click on 'Get External Data'
4. Click on 'From Other Sources'
5. A list of sources will pop-up - choose 'From Data Connection Wizard'
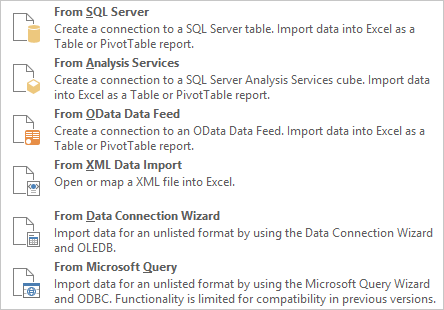
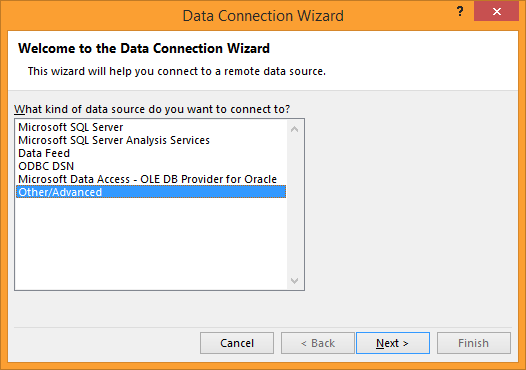
6. The Data Connection Wizard will open.
7. Highlight 'Other/Advanced' and click the 'Next >' button.
8. The Data Links Properties window will open. Select 'Advantage OLE DB Provider'

NOTE: If the 'Advantage OLE DB Provider'' item is not listed, your ODBC/OLEDB ADS client setup is incomplete. Close Excel. And repeat Step 1 above.
9. Click the Next >>' button or choose the 'Connection' tab.
10. Fill in the data connection parameters as required, for example:
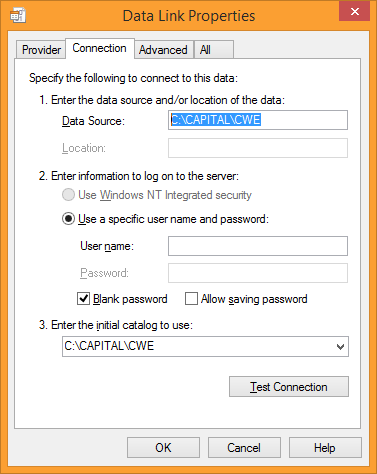
NOTE: The data source path is a folder of the company whose data wish to access. You can click on the 'Test Connection' button to verify the info you have entered and to see if the server is reachable. For this to work, your ADS server software must be installed and running on the computer you specified in your Data Source path. It is possible to use a driver letter or a URL path as part of your network connection, such as: \\myserver\edrive\database\capital\myfirm
11. Click on the 'Advanced' tab. Make sure that your access rights are correct for what you are planning to do with the data. It is strongly recommended that you only select 'Read' access.
12. Next click on the 'All' tab and ensure that:
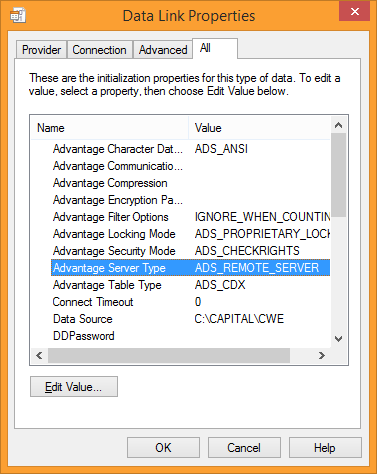
- Advantage Character Data Type: ADS_ANSI
- Advantage Filter Options: either IGNORE_WHEN_COUNTING or RESPECT_WHEN_COUNTING
- Advantage Locking Mode: ADS_PROPRIETARY_LOCKING
- Advantage Server Type: ADS_REMOTE_SERVER
- Table Type: ADS_CDX
To edit an item either double-click on it, or highlight it and click the 'Edit Value' button.
13. Click on OK.
14. The 'Select Database and Table' wizard page should now be displayed. Ensure the 'Connect to specific table' option is ticked and choose a table from the list.
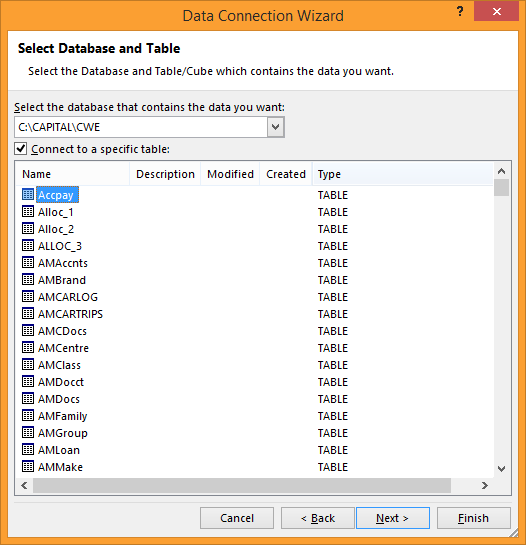
15. Click Next for additional options if required or click on Finish' button.
16. The Excel Import Data options dialog will be displayed. Here you can change how the data is to be imported.
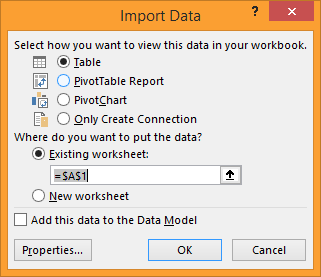
17. Click OK to begin importing the table into the spreadsheet.
